NetApp Clustered Data ONTAP

NetApp Inc is an American company in the field of Computer Storage and Data Management. It is listed in the Fortune 500 companies.

NetApp was the first to reach the market with enterprise-ready, unified scale-out storage in the form of NetApp Clustered Data ONTAP. This essentially lets you take NetApp storage arrays and cluster them together to form a virtualized shared storage pool.

Scale-Up Vs Scale-Out Storage

All storage controllers have a physical limit to which they can be expanded, eg – number of CPUs, memory slots, space for disk shelves. Once the limit for these has been reached and the controller is completely populated the only option is to aquire one or more additional controller. This is called as “scale-up” where you replace your existing controller with one with newer technology or you run multiple controllers side by side. Scaling-up increases the operational burden as the environment grows. Eg – When you replace a controller with a new one, then data migration is needed which is time consuming, often disruptive and complex. If you use 2 or more controllers then you need tools for load balancing them.

With “scale-out” you can seamlessly add controllers to your resource pool which resides on a virtualized shared storage. NetApp provides this storage virtualization and using scale-out, you can move host & client connection, data stores non disruptively anywhere in the resource pool. And all this can be achieved while your environment is online and serving data, without any downtime!

Clustered Data ONTAP Architecture

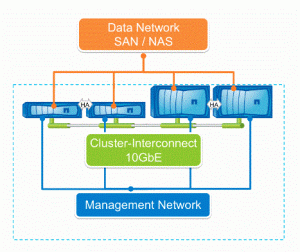
clustered_ontap

The basic building block is a high availability (HA) pair which consists of 2 identical nodes. The nodes are connected using redundant cabled network paths. When one node goes down, the other takes over its storage ans maintains access to its data. When the downed system rejoins the cluster, the partner node gives back the storage resources. The minimum cluster size starts with 2 nodes in an HA pair. Using non-disruptive technology refresh, the cluster can evolve to the largest cluster size and powerful hardware.

VServer / Virtual Array

The storage array that resides on top of the available hardware. It maps to the IP address, hostname and/or the fiber channel addresses they attach to. Mapping a LUN is done through vserver. A file share or export is mapped ot mounted via the vserver.

LIFs

These are logical interfaces or virtual adapters that can share the same physical interfaces or be placed on dedicated interfaces.

Cluster Virtualization

A cluster is composed of physical hardware: storage controllers with attached disk shelves, network interface cards, and, optionally, Flash Cache cards. Together these components create a physical resource pool that is virtualized as logical cluster resources to provide data access. Abstracting and virtualizing physical assets into logical resources provide the flexibility and potential multi-tenancy in clustered Data ONTAP as well as the object mobility capabilities that are the heart of nondisruptive operations.
 

Storage Efficiency and Data Protection

Storage efficiency built into clustered Data ONTAP offers substantial space savings, allowing more data to be stored at lower cost. Data protection provides replication services, so valuable data is backed up and recoverable.

Thin Provisioning

Volumes are created using virtual sizing. All the storage is not pre-allocated upfront. The space is unused until data is written to the volume, and only that much space is used as needed by the data. The unused storage is shared across all volumes.

Deduplication

Deduplication removes duplicate data blocks in primary & secondary storage. It stores only unique blocks. Deduplication run can be customized.

Compression

Compression is achieved using algo which replaces repeating patterns within a subset of a file.
Knife-cloud Gem: Introduction & Knife Plugin Development Using It

Reposted from – Clogeny, An Msys Company

Chef Software, Inc. has released knife-cloud gem. This article talks about what is the knife-cloud gem and how you can use it to develop your custom knife-cloud plugin.

Knife is a CLI tool used for communication between local chef-repo and the Chef Server. There are a couple of knife subcommands supported by Chef, e.g., knife bootstrap, knife cookbook, knife node, knife client, knife ssh, etc. Knife plugin is an extension of the knife commands to support additional functionality. There are about 11 knife plugins managed by Chef and a lot more managed by the community.

The concept of knife-cloud came up as we have a growing number of cloud vendors, and therefore a number of knife plugins, to support the cloud specific operations. The knife-cloud plugins use cloud specific APIs to provision a VM and bootstrap it with Chef. These plugins perform a number of common tasks, such as connection to the node using SSH or WinRM and bootstrapping the node with Chef. The knife-cloud (gem) has been designed to integrate the common tasks of all knife cloud plugins. As a developer of a knife cloud plugin, you will not have to worry about writing the generic code in your plugin. More importantly, if there is any bug or change in the generic code of the knife plugin, the fix would be done in knife-cloud itself. Today we need to apply such changes across all the knife plugins that exist.

Knife-cloud is open source available at: https://github.com/opscode/knife-cloud.
You may refer to https://github.com/opscode/knife-cloud#writing-your-custom-plugin about the steps to write your custom knife cloud plugin.

Clogeny Technologies has written a knife-cloud scaffolder (https://github.com/ClogenyTechnologies/knife-cloud-scaffolder) to make your job even simpler. The scaffolder generates the stub code for you with appropriate TODO comments to guide you in writing your cloud specific code.

To use the knife-cloud-scaffolder:
– git clone https://github.com/ClogenyTechnologies/knife-cloud-scaffolder
– Update properties.json
– Run the command: ruby knifecloudgen.rb E.g., ruby knifecloudgen.rb ./knife-myplugin ./properties.json

Your knife-myplugin stub will be ready. Just add your cloud specific code to it and you should be ready to use your custom plugin.

Windows Remote Management and Kerberos Authentication

Windows Remote Management is used for communication between computers and involves the security of the communication using different methods of authentication and message encryption.

There are following types of authentications:

Basic Authentication:

Least secure
User name & Password is used for authentication
Can be used for HTTP or HTTPS transport
Used in a domain or workgroup

Negotiate Authentication:

Also called WIA ( Windows Integrated Authentication)
Negotiated, single sign on
SPNEGO – Simple & Protected GSSAPI negotiation mechanism
SPNEGO determines if to use kerberos or NTLM
Kerberos is prefered

Digest Authentication:

Client request -> server -> authentication server (domain controller)
If client is authenticated, then the server gets a digest session key for subsequent requests from the client

Kerberos Authentication:

Mutual authentication using encrypted keys between client & server
Client account must be on domain account in the same domain as the server

SPNEGO:

An authentication mechanism used by the client or server receiving requests for data through the WinRM in an Active Directory context
SPNEGO is based on an Request For Comments (RFC) protocol produced by the Internet Engineering Task Force (IETF)

Diff between kerberos and negotiate:

Kerberos is the default method of authentication when the client is in a domain and the remote destination string is not one of the following: localhost, 127.0.0.1, or [::1].
Negotiate is the default method when the client is in domain, but the remote destination string is one of the following: localhost, 127.0.0.1, or [::1].

CredSSP Authentication:

CredSSP authentication is intended for environments where Kerberos delegation cannot be used.
It was originally developed to support Remote Desktop Services single sign-on, however it can also be leveraged by other technologies such as PowerShell remoting.
CredSSP provides a non-kerb mechanism to delegate a session’s local credentials to a remote resource.

Setting up client and server for Kerberos Authentication

First steps

Create client and server machines.
Add them to the same domain

Configure Server

You can use the WinRM tool. Run the following commands –

winrm quickconfig -q
winrm set winrm/config/winrs @{MaxMemoryPerShellMB=”300″}
winrm set winrm/config @{MaxTimeoutms=”1800000″}
winrm set winrm/config/service @{AllowUnencrypted=”true”}
winrm set winrm/config/service/auth @{Basic=”false”}
netsh advfirewall firewall set rule name=”Windows Remote Management (HTTP-In)” profile=public protocol=tcp localport=5985 remoteip=localsubnet new remoteip=any
winrm set winrm/config/client/auth @{Digest=”false”}
winrm set winrm/config/service/auth @{Kerberos=”true”}
winrm set winrm/config/client @{TrustedHosts=”*”}

To ensure that Kerberos authentication is enabled on WinRM service:

winrm get winrm/config/service/auth

Connect to server from client

Using winrm –

winrm identify -r:servername.domain.com -auth:Kerberos -u:username@domain.com -p:password

Using winrs –

winrs /r:servername.domain.com /u:domain/username> /p:password dir

Using Chef’s knife-windows –

knife winrm -m servername.domain.com -x username -P passowrd -R krb5_realm dir

knife winrm -m servername.domain.com -x username -P passowrd -t kerberos-keytab -R krb5_realm -S kerberos-service dir